![[Updated] In 2024, Revolutionary Mac Screenshot Tools A Five-Step Guide](https://thmb.techidaily.com/5a88545795b5ca3ae26e7c947a2bcf90d0830b425a670680d043fc15ab445500.jpg)
"[Updated] In 2024, Revolutionary Mac Screenshot Tools A Five-Step Guide"
Revolutionary Mac Screenshot Tools: A Five-Step Guide
How to Screenshot on Mac - 5 Simple Ways

Max Wales
Apr 18, 2024• Proven solutions
Unlike Windows PC, Mac computer doesn’t own the “PrintScreen” shortcut button to 1-click screenshot of the screen. However, we find the other way to take snapshots or screen records on Mac. Besides, if you want to know the shortcut keyboard command on Mac, just keep reading.
- Part 1: How to Make Screen Record and Screenshots on Mac - Edit After Screenshots
- Part 2: 4 Methods to Capture Screenshots on Mac Itself
Part 1: How to Make Screen Record and Screenshots on Mac
Here, we would like to recommend a tool for making screenshots and screen recordings at the same time. Filmora Screen Recorder can easily capture and record the operation on a Mac. Below are the 3 ways to start the function. Now download and install Filmora on Mac first, then keep reading.
Easy to Make Screenshots on Mac
 Secure Download
Easy to Make Screenshots on Mac
Secure Download


Supported System: macOS V14 (Sonoma), macOS V13 (Ventura), macOS V12 (Monterey), macOS v11 (Big Sur), macOS v10.15 (Catalina).
Step 1: Here are the entrance you can find on Filmora to launch the Screen Recorder function:
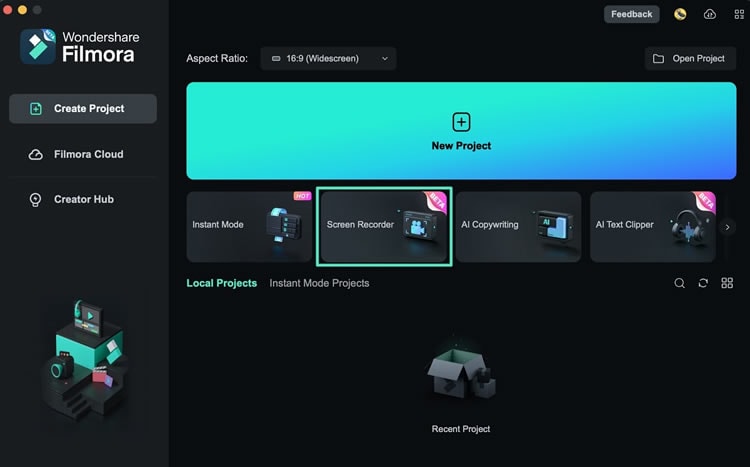
1. From the Start Interface
While you launch Filmora, you will see “Screen Recorder“ tab directly. Just click on it.
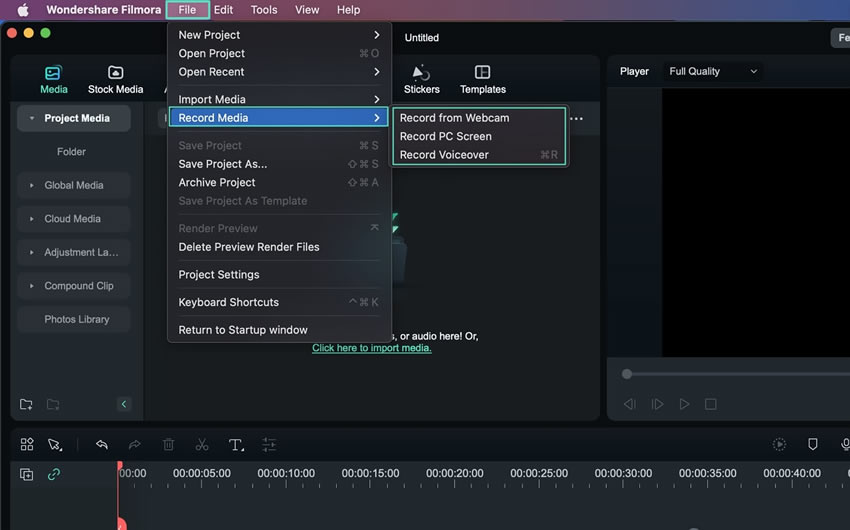
2. From the Top Toolbar
Enter Filmora and navigate towards the “Files“ > “Record Media“. You will see 3 options for recording.
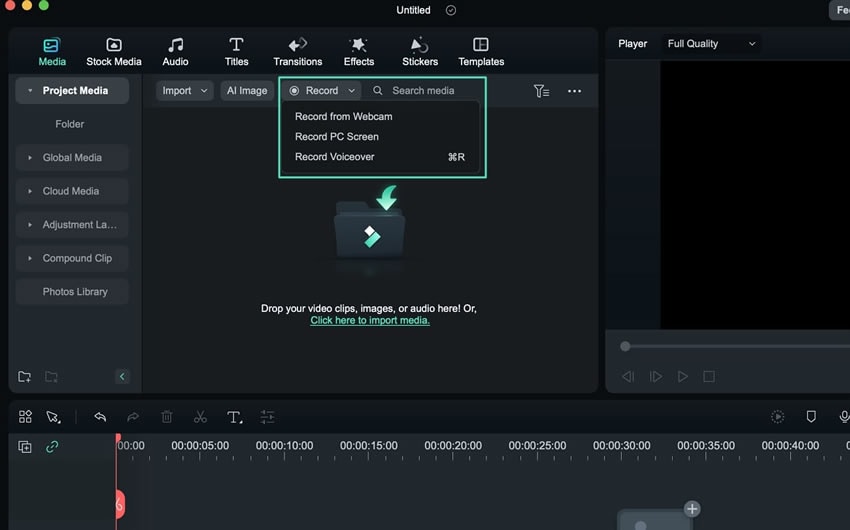
3. From the Search Bar Menu
Enter Filmora then find the search bar, the “Record“ option just next to it. Select a suitable recording option.
Make Screen Record and Snapshot on Mac
Secure Download
Make Screen Record and Snapshot on Mac
Secure Download
Step 2: After selecting the screen recorder option, customize the recording settings you like, then click the “Red“ button to start screen recording on Mac.

Step 3: Drag and drop the recording video clip to the timeline, you can now preview the video and click the “Snapshot“ icon to screenshot the screen, or use the shortcut key “Control + Option + S“ to capture a screenshot directly.

Then you can make simple settings and get your screenshots.

Want to Make Screen Record on Mac? Try This Out!
Filmora Screen Recorder helps to record games, videos, lectures, and webcams with original visual quality on Mac. Furthermore, you can re-edit the recording video clips with various AI features.
Screen Record on Mac with Ease Screen Record on Mac with Ease Learn More >
Screen Record on iPad with Ease Learn More >
Part 2: 4 Methods to Capture Screenshots on Mac Itself
Besides using a screenshot tool, Mac also offers multiple ways to make screenshots on a Mac PC or Macbook. Keep reading to find out the 4 ways!
- Method 1: 3 Ways to Take Screenshots with Mac’s Keyboard Commands
- Method 2: Taking Screenshots with Touch Bar on MacBook Pro
- Method 3: Capture Screen with Built-in Preview App in Mac
- Method 4: Make Screenshots with Pre-installed Grab App
Method 1 3 Ways to Take Screenshots with Keyboard Commands
Mac offers 3 keyborad commands to capture the entire screen, specific screen area and window. Read on.
Way 1: How to Capture an Entire Screen on a Mac?
Make sure that everything you want to include in the picture is clearly visible on the screen and simply hold the Command + Shift + 3 keyboard buttons to create the screenshot.

Way 2: How to Screenshot a Portion of the Screen on a Mac?
If you want to take screenshot on a partial part of the screen, simply hit the Command + Shift + 4 keys. Then drag the crosshair mouse cursor to the area you want to capture.

The crosshair will also display the pixel count to show you the size of the screenshot. Holding the Shift button will allow you to lock all corners of the selection rectangle, except the one you are dragging.
Way 3: How to Take Screenshots of a Specific App Window?
Launch the app or open the window you’d like to screenshot, and then hold the Command + Shift + 4 keys on your keyboard. Press the SPACE key to select the window, as the selected area turns blue, press the left-click of your mouse or hit the Enter button to snap a screenshot.

Method 2 Taking Screenshots with Touch Bar on MacBook Pro
MacBook Pro owners can utilize the Touch Bar feature to take screenshots on their computers. Click on the Apple logo from the menu bar, then select the System Preferences option. Click on the Keyboard > Customize Control Strip feature, located at the bottom of the screen. Once the new window pops-out you should locate the Screenshot icon and drag and drop it to the Touch Bar, and click Done.
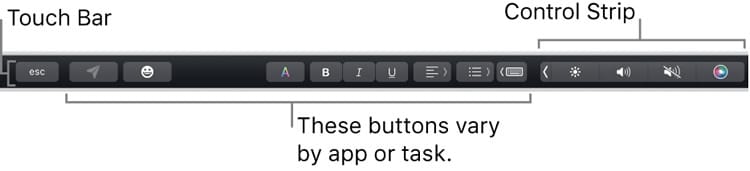
Now that the Screenshot option is available from the Touch Bar, you can simply click on its icon and take screenshots of the full screen, a portion of it, or a single window.
Method 3 Capture Screen with Built-in Preview App
Open the Preview app, go to File and find the Take Screenshot sub-menu. You can either capture a full screen, a part of it you select or take a screenshot of an active window. Holding the Control button while taking a screenshot will enable you to save the picture to the clipboard and paste it into a photo editing software or a word processor.

The Preview app lets you select the saving path and name it before saving.
Method 4 Make Screenshots with Pre-installed Grab App
Go to Utility > Applications to launch Grab. Click on the Capture menu and select the option that suits you best. You can take a screenshot of an entire screen, select the region of the screen you want to capture or take a screenshot of a particular window.

The Timed Screen feature can be used if you want to have a ten-second delay before you take the screenshot, which can be quite useful if you need time to organize the desktop before the screenshot is taken.

If you would like to include the mouse cursor in your screenshots, you have go to the Preferences option, then select the Pointer Type, it also able to record the clicking sound if needed.
Conclusion
Mac provides the screenshots itself, also, some built-in apps are available to make screenshots in different cases. However, if you need an all-in-one screenshot and screen recorder program, try Filmora Screen Recorder , it will make it easy to solve your problem.
Secure Download
Secure Download
Max Wales
Max Wales is a writer and a lover of all things video.
Follow @Max Wales
Max Wales
Apr 18, 2024• Proven solutions
Unlike Windows PC, Mac computer doesn’t own the “PrintScreen” shortcut button to 1-click screenshot of the screen. However, we find the other way to take snapshots or screen records on Mac. Besides, if you want to know the shortcut keyboard command on Mac, just keep reading.
- Part 1: How to Make Screen Record and Screenshots on Mac - Edit After Screenshots
- Part 2: 4 Methods to Capture Screenshots on Mac Itself
Part 1: How to Make Screen Record and Screenshots on Mac
Here, we would like to recommend a tool for making screenshots and screen recordings at the same time. Filmora Screen Recorder can easily capture and record the operation on a Mac. Below are the 3 ways to start the function. Now download and install Filmora on Mac first, then keep reading.
Easy to Make Screenshots on Mac
Secure Download
Easy to Make Screenshots on Mac
Secure Download
Supported System: macOS V14 (Sonoma), macOS V13 (Ventura), macOS V12 (Monterey), macOS v11 (Big Sur), macOS v10.15 (Catalina).
Step 1: Here are the entrance you can find on Filmora to launch the Screen Recorder function:
1. From the Start Interface
While you launch Filmora, you will see “Screen Recorder“ tab directly. Just click on it.
2. From the Top Toolbar
Enter Filmora and navigate towards the “Files“ > “Record Media“. You will see 3 options for recording.
3. From the Search Bar Menu
Enter Filmora then find the search bar, the “Record“ option just next to it. Select a suitable recording option.
Make Screen Record and Snapshot on Mac
Secure Download
Make Screen Record and Snapshot on Mac
Secure Download
Step 2: After selecting the screen recorder option, customize the recording settings you like, then click the “Red“ button to start screen recording on Mac.
Step 3: Drag and drop the recording video clip to the timeline, you can now preview the video and click the “Snapshot“ icon to screenshot the screen, or use the shortcut key “Control + Option + S“ to capture a screenshot directly.
Then you can make simple settings and get your screenshots.
Want to Make Screen Record on Mac? Try This Out!
Filmora Screen Recorder helps to record games, videos, lectures, and webcams with original visual quality on Mac. Furthermore, you can re-edit the recording video clips with various AI features.
Screen Record on Mac with Ease Screen Record on Mac with Ease Learn More >
Screen Record on iPad with Ease Learn More >
Part 2: 4 Methods to Capture Screenshots on Mac Itself
Besides using a screenshot tool, Mac also offers multiple ways to make screenshots on a Mac PC or Macbook. Keep reading to find out the 4 ways!
- Method 1: 3 Ways to Take Screenshots with Mac’s Keyboard Commands
- Method 2: Taking Screenshots with Touch Bar on MacBook Pro
- Method 3: Capture Screen with Built-in Preview App in Mac
- Method 4: Make Screenshots with Pre-installed Grab App
Method 1 3 Ways to Take Screenshots with Keyboard Commands
Mac offers 3 keyborad commands to capture the entire screen, specific screen area and window. Read on.
Way 1: How to Capture an Entire Screen on a Mac?
Make sure that everything you want to include in the picture is clearly visible on the screen and simply hold the Command + Shift + 3 keyboard buttons to create the screenshot.
Way 2: How to Screenshot a Portion of the Screen on a Mac?
If you want to take screenshot on a partial part of the screen, simply hit the Command + Shift + 4 keys. Then drag the crosshair mouse cursor to the area you want to capture.
The crosshair will also display the pixel count to show you the size of the screenshot. Holding the Shift button will allow you to lock all corners of the selection rectangle, except the one you are dragging.
Way 3: How to Take Screenshots of a Specific App Window?
Launch the app or open the window you’d like to screenshot, and then hold the Command + Shift + 4 keys on your keyboard. Press the SPACE key to select the window, as the selected area turns blue, press the left-click of your mouse or hit the Enter button to snap a screenshot.
Method 2 Taking Screenshots with Touch Bar on MacBook Pro
MacBook Pro owners can utilize the Touch Bar feature to take screenshots on their computers. Click on the Apple logo from the menu bar, then select the System Preferences option. Click on the Keyboard > Customize Control Strip feature, located at the bottom of the screen. Once the new window pops-out you should locate the Screenshot icon and drag and drop it to the Touch Bar, and click Done.
Now that the Screenshot option is available from the Touch Bar, you can simply click on its icon and take screenshots of the full screen, a portion of it, or a single window.
Method 3 Capture Screen with Built-in Preview App
Open the Preview app, go to File and find the Take Screenshot sub-menu. You can either capture a full screen, a part of it you select or take a screenshot of an active window. Holding the Control button while taking a screenshot will enable you to save the picture to the clipboard and paste it into a photo editing software or a word processor.
The Preview app lets you select the saving path and name it before saving.
Method 4 Make Screenshots with Pre-installed Grab App
Go to Utility > Applications to launch Grab. Click on the Capture menu and select the option that suits you best. You can take a screenshot of an entire screen, select the region of the screen you want to capture or take a screenshot of a particular window.
The Timed Screen feature can be used if you want to have a ten-second delay before you take the screenshot, which can be quite useful if you need time to organize the desktop before the screenshot is taken.
If you would like to include the mouse cursor in your screenshots, you have go to the Preferences option, then select the Pointer Type, it also able to record the clicking sound if needed.
Conclusion
Mac provides the screenshots itself, also, some built-in apps are available to make screenshots in different cases. However, if you need an all-in-one screenshot and screen recorder program, try Filmora Screen Recorder , it will make it easy to solve your problem.
Secure Download
Secure Download
Max Wales
Max Wales is a writer and a lover of all things video.
Follow @Max Wales
Also read:
- [New] 2024 Approved A Complete Blueprint for Effortless Recording of Live Hulu on Various Systems
- [New] Crafting Professional Livestreams on YouTube and Twitch Using OBS
- [New] OBS Versus ScreenSnapper
- [New] SimplySnap Screen Shots for W10 Users for 2024
- [New] Strategic Insights Into Aesthetic Success for Audio Brands
- [Updated] 2024 Approved EyeCapture Screen Logger X
- [Updated] Compreenas Record Your Life in HD via VLC Media Player for 2024
- [Updated] The Metaverse Vs. Omniverse Showdown A Comprehensive Overview
- 2024 Approved Expert Audio Adjustments for YouTube Content Makers
- 2024 Approved Introduce Audible Elements Seamlessly to Premiere Pro
- 2024 Approved Screen Capture Without Breaking the Bank Our Top Picks
- 2024 Approved The Art of Capturing Scenes EZvide's Screencast Solution
- 2024 Approved The Future of Display Technology with EIZO's High-Res Monitor
- 2024 Approved Unlocking Maximum Potential Screen Recording on AnyMac
- In 2024, Live Recording Simplified Logitech Webcam Setup Steps
- The Magnificent Art of Pokemon Go Streaming On Infinix Smart 8 Plus? | Dr.fone
- Undeleted lost videos from Razr 40 Ultra
- Title: [Updated] In 2024, Revolutionary Mac Screenshot Tools A Five-Step Guide
- Author: Adele
- Created at : 2025-03-04 17:06:09
- Updated at : 2025-03-06 11:27:09
- Link: https://screen-recording.techidaily.com/updated-in-2024-revolutionary-mac-screenshot-tools-a-five-step-guide/
- License: This work is licensed under CC BY-NC-SA 4.0.