![[Updated] Decoding the Full Scope of OBS Screen Recorder for 2024](https://thmb.techidaily.com/485101ae8f555e145174a15eda6071c25617b2b00c96089d339b8e4537366b75.jpg)
[Updated] Decoding the Full Scope of OBS Screen Recorder for 2024
Decoding the Full Scope of OBS Screen Recorder
OBS, or Open Broadcaster Software, is a screen recording and live streaming software that has become increasingly popular among content creators and gamers alike. Not only is it free and open-source, but it also offers a wide range of features that make it easy to use and customize to your needs. Whether you’re a gamer looking to create content for YouTube, a teacher wanting to record online lessons, or a business owner hoping to create tutorials for your employees, OBS has something to offer.
One of the biggest advantages of OBS is its versatility. It can be used to record anything from video games to webinars, and it offers a variety of customization options to ensure that your recordings are of the highest quality. With OBS, you can choose from a variety of recording formats, including MP4, FLV, and MOV, and you can adjust the resolution, frame rate, and bitrate to suit your needs. What’s more, it is free.
Part 1. How to Download and Install OBS Studio
Part 2. Best Settings for OBS Recorder
Part 3. How to Record Screen with OBS
Part 4. Alternative Tool to Record Computer Screen

Part 1. How to Download and Install OBS Studio
OBS Studio is an incredible program that doesn’t make a big deal about an effect on your PC’s exhibition. It’s anything but an instrument that simply fires up and works, nonetheless. It expects time to see how it functions and how to benefit from it, and the persistence to figure out how to investigate when things don’t fill in true to form. There are a few circumstances where OBS is ideal over different arrangements. Assuming you will likely record your ongoing interaction and afterwards make a YouTube playthrough instructional exercise, for instance, then, at that point, OBS Studio is an incredible choice.
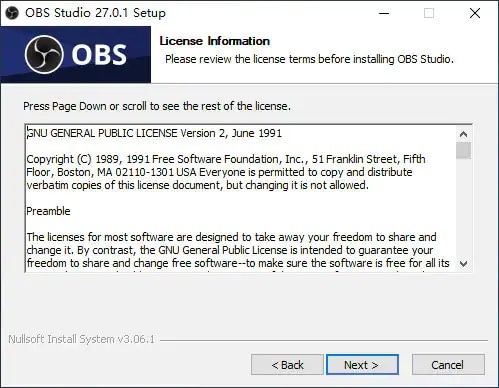
Step 1: Visit the Website
To begin with OBS Screen Recorder, you want to download and introduce it on your PC. OBS is accessible for all well-known working frameworks, including Windows, Mac, and Linux. You can free download OBS from its authority site
Step 2: Download the Desired Version
OBS is without a doubt one of the most incredible web-based software for Twitch, YouTube, Facebook Live, and so on Video bitrate, encoder and sound bitrate is accessible to design. If you intend to stream ongoing interaction just, select Game Capture.
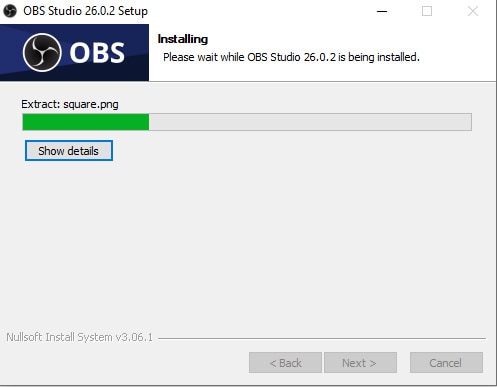
Step 3: Install the OBS Studio
As we know that, OBS Studio permits you to change the volume from various sources on the double, during recording or gushing also.
Part 2. Best Settings for OBS Recorder
OBS works best assuming you have a multiscreen arrangement where you can notice OBS on one showcase and play your game on the other, however that is not a necessity. OBS Studio packs a ton of elements and settings, and in case you’re willing to invest the energy to learn it, this program offers astonishing adaptability for power clients. To facilitate the expectation to absorb information, OBS Studio incorporates a wizard to assist you with improving your arrangement for web-based or recording video when you first fire up the program. Not at all like the other applications, OBS doesn’t hurl an in-game overlay. All things being equal, it simply takes care of its responsibilities behind the scenes. You’ll likewise need to advise OBS to begin recording or streaming once your game is running or not long before you fire it up.
Video: Another admirable component of OBS Studio is its top-notch video catch. The product kills any worry with the number of edges each second (fps) caught and the video quality. It allows you to alter the catch quality, you effortlessly set your goal or pass by that of your screen. Likewise, it’s not difficult to set your fps and apply a goal downscale of your decision.
Sound: It likewise empowers you to record the sound card of your PC and in-assembled amplifier. There are additional elements to utilize push-to-talk, quiet/unmute MIC, work area support, MIC/AUX lift, and MIC sync offset. You can generally add remarks or your voice as wanted.
Output: OBS Studio makes it simple to dabble with the diverse recording and live streaming settings to track down the most ideal choice. The application likewise permits you to add text and logo to the live recordings effortlessly.
Hotkeys: Set up the hotkeys for getting down on highlights immediately. This part is exceptionally degree modified, so there will be no further guidelines on the most proficient method to set up hotkeys.
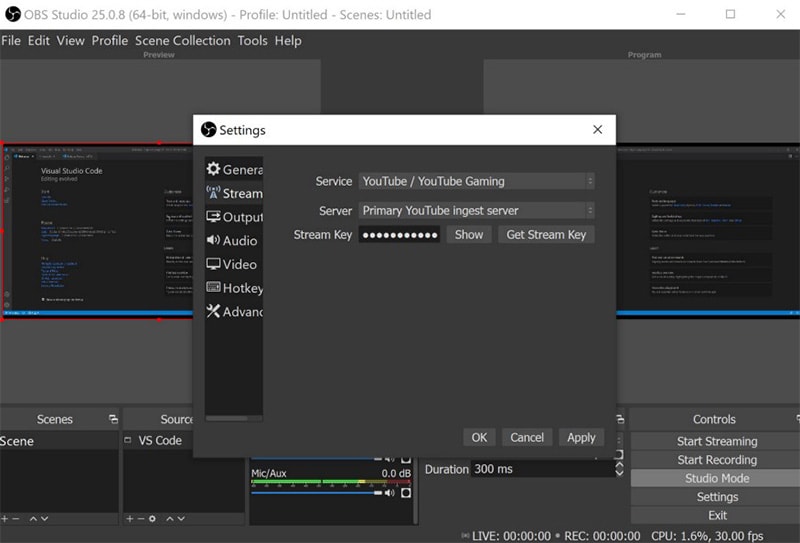
Stream: It empowers you to live web-based to Twitch, YouTube, Facebook, and some other RTMP server. You can likewise add different components to your stream or recording, remembering an image for picture webcam shot, customized watermarks, and that’s only the tip of the iceberg. In addition, you can likewise set up the Zoom show, or stream Microsoft Team.
Part 3. How to Record Screen with OBS
In the wake of surveying and testing, all OBS highlights most would agree that it is probably the best program for catching video and real-time. A great scene manager permits you to control activities during streams as definitively as could be expected. The way that OBS is free makes it available to anybody, and it doesn’t devour a lot of memory and assets, settling on it the ideal decision for some clients. Here are its use steps:
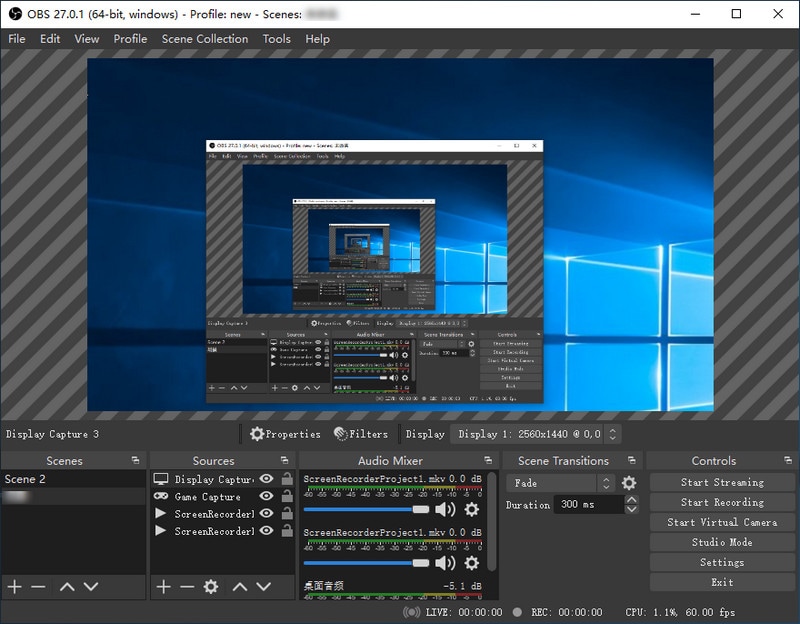
Step 1: Launch the Application
To get everything rolling with OBS Studio you initially make what is known as a “Scene” that houses generally your recording sources. Then, at that point, you add the sources like a game, your webcam, amplifier, and watermark. OBS Studio’s Settings offer a flat-out ton of designs, yet the key ones you’ll need to focus on are under Settings > Output > Recording. Here you can indicate the video encoder to utilize, the recording organization, and recording quality.


Step 2: Start Recording
Whenever you’ve determined everything for recording, you click the Start Recording button, fire up your game, and afterwards when you’re done snap Stop Recording. Before running your first authority recording, you’ll need to affirm that OBS is arranged appropriately and working before depending on it for a full gaming meeting.
Step 3: Stop and Save Recording
Finally, when you’ve done the recording, hit the Stop Recording button and the file will automatically be saved to your PC, to the desired location that you’ve inserted in the saving slot.
## Part 4\. Alternative Tool to Record Computer ScreenAre you looking for a reliable and user-friendly screen recording software that can help you create high-quality videos for your projects? While OBS (Open Broadcasting Software) is a popular choice among many content creators, it may not be the best fit for everyone. Fortunately, there is an alternative that offers similar features and more: Filmora.
Filmora is a powerful and versatile screen recording software that is designed for both beginners and professionals. With its intuitive interface and easy-to-use tools, you can create impressive videos in no time. Whether you want to record your gameplay, tutorials, webinars, or presentations, Filmora has everything you need to capture, edit, and share your content. Plus, it offers a wide range of customization options, including audio and video effects, transitions, text overlays, and more. With Filmora, you can create videos that stand out and engage your audience, without the steep learning curve of other screen recording software.
Steps On How to Record a Video with Filmora Recorder
To use Filmora as the best alternative to OBS Studio, follow the steps below to begin recording and saving your screen with the Filmora solution.
For Win 7 or later (64-bit)
For macOS 10.12 or later
Step 1: Install and Launch the Software
To start, visit the official website and download the Filmora installer for your desired system. Afterwards, install the software inside your system to get started. For that, you can use this OBS Studio alternative on the go. Just visit the Wondershare official platform on the web and from there, you can find both versions of Filmora software, i-e., Windows and Mac versions with the latest version.

Step 2: Setup Recording UI
To customize your screen, firstly, you need to proceed with the New Project and then open the Screen recorder. For that, go to the File > Record Media and then select your desired format of screen recording from the list as shown here. It’ll take you to the user-friendly UI of Filmora where you can pick up the recording feature on-spot as shown in the figure below:

Step 3: Start Recording
To initiate, simply hit the Record button and it shall start recording your customized screen right away. And same is the process when you’re done with the recording, hit the Stop button that’ll take you inside the video editor to polish your recorded content.

Step 4: Save or Share your Recordings
In the end, when you’re done with various editing and customizations of the editing and recording, Filmora also allows you to upload your masterpiece directly to YouTube or some other renowned platform, you can without much of a stretch select your desired platform to share from there. Just hit the Export button as shown here and it can reveal various choices for you on the go.
Conclusion
OBS is a splendid application to make web-based recordings happen and stream catch on-screen exercises. In any case, it does not have the absolute most significant highlights of common screen recorders. The highlights could be comment devices, editors, document sharing, and so forth Administered of these referenced elements, clients’ involvement with recording could be impacted. Also, to patch up this lack of OBS, clients host to go to third-gathering software like video editors for help. OBS is qualified as the most impressive freeware in the screen recorder industry, when clients retained in its activities lastly become acclimated to it, OBS will turn into their most expert right-hand associate of all time. It will draw in a lot of amateurs who don’t care for ordinary video altering virtual products with muddled apparatuses plan, as recommended above, to the Filmora recorder solution.
Part 2. Best Settings for OBS Recorder
Part 3. How to Record Screen with OBS
Part 4. Alternative Tool to Record Computer Screen
Part 1. How to Download and Install OBS Studio
OBS Studio is an incredible program that doesn’t make a big deal about an effect on your PC’s exhibition. It’s anything but an instrument that simply fires up and works, nonetheless. It expects time to see how it functions and how to benefit from it, and the persistence to figure out how to investigate when things don’t fill in true to form. There are a few circumstances where OBS is ideal over different arrangements. Assuming you will likely record your ongoing interaction and afterwards make a YouTube playthrough instructional exercise, for instance, then, at that point, OBS Studio is an incredible choice.
Step 1: Visit the Website
To begin with OBS Screen Recorder, you want to download and introduce it on your PC. OBS is accessible for all well-known working frameworks, including Windows, Mac, and Linux. You can free download OBS from its authority site
Step 2: Download the Desired Version
OBS is without a doubt one of the most incredible web-based software for Twitch, YouTube, Facebook Live, and so on Video bitrate, encoder and sound bitrate is accessible to design. If you intend to stream ongoing interaction just, select Game Capture.
Step 3: Install the OBS Studio
As we know that, OBS Studio permits you to change the volume from various sources on the double, during recording or gushing also.
Part 2. Best Settings for OBS Recorder
OBS works best assuming you have a multiscreen arrangement where you can notice OBS on one showcase and play your game on the other, however that is not a necessity. OBS Studio packs a ton of elements and settings, and in case you’re willing to invest the energy to learn it, this program offers astonishing adaptability for power clients. To facilitate the expectation to absorb information, OBS Studio incorporates a wizard to assist you with improving your arrangement for web-based or recording video when you first fire up the program. Not at all like the other applications, OBS doesn’t hurl an in-game overlay. All things being equal, it simply takes care of its responsibilities behind the scenes. You’ll likewise need to advise OBS to begin recording or streaming once your game is running or not long before you fire it up.
Video: Another admirable component of OBS Studio is its top-notch video catch. The product kills any worry with the number of edges each second (fps) caught and the video quality. It allows you to alter the catch quality, you effortlessly set your goal or pass by that of your screen. Likewise, it’s not difficult to set your fps and apply a goal downscale of your decision.
Sound: It likewise empowers you to record the sound card of your PC and in-assembled amplifier. There are additional elements to utilize push-to-talk, quiet/unmute MIC, work area support, MIC/AUX lift, and MIC sync offset. You can generally add remarks or your voice as wanted.
Output: OBS Studio makes it simple to dabble with the diverse recording and live streaming settings to track down the most ideal choice. The application likewise permits you to add text and logo to the live recordings effortlessly.
Hotkeys: Set up the hotkeys for getting down on highlights immediately. This part is exceptionally degree modified, so there will be no further guidelines on the most proficient method to set up hotkeys.
Stream: It empowers you to live web-based to Twitch, YouTube, Facebook, and some other RTMP server. You can likewise add different components to your stream or recording, remembering an image for picture webcam shot, customized watermarks, and that’s only the tip of the iceberg. In addition, you can likewise set up the Zoom show, or stream Microsoft Team.
Part 3. How to Record Screen with OBS
In the wake of surveying and testing, all OBS highlights most would agree that it is probably the best program for catching video and real-time. A great scene manager permits you to control activities during streams as definitively as could be expected. The way that OBS is free makes it available to anybody, and it doesn’t devour a lot of memory and assets, settling on it the ideal decision for some clients. Here are its use steps:
Step 1: Launch the Application
To get everything rolling with OBS Studio you initially make what is known as a “Scene” that houses generally your recording sources. Then, at that point, you add the sources like a game, your webcam, amplifier, and watermark. OBS Studio’s Settings offer a flat-out ton of designs, yet the key ones you’ll need to focus on are under Settings > Output > Recording. Here you can indicate the video encoder to utilize, the recording organization, and recording quality.
Step 2: Start Recording
Whenever you’ve determined everything for recording, you click the Start Recording button, fire up your game, and afterwards when you’re done snap Stop Recording. Before running your first authority recording, you’ll need to affirm that OBS is arranged appropriately and working before depending on it for a full gaming meeting.
Step 3: Stop and Save Recording
Finally, when you’ve done the recording, hit the Stop Recording button and the file will automatically be saved to your PC, to the desired location that you’ve inserted in the saving slot.
Part 4. Alternative Tool to Record Computer Screen
Are you looking for a reliable and user-friendly screen recording software that can help you create high-quality videos for your projects? While OBS (Open Broadcasting Software) is a popular choice among many content creators, it may not be the best fit for everyone. Fortunately, there is an alternative that offers similar features and more: Filmora.
Filmora is a powerful and versatile screen recording software that is designed for both beginners and professionals. With its intuitive interface and easy-to-use tools, you can create impressive videos in no time. Whether you want to record your gameplay, tutorials, webinars, or presentations, Filmora has everything you need to capture, edit, and share your content. Plus, it offers a wide range of customization options, including audio and video effects, transitions, text overlays, and more. With Filmora, you can create videos that stand out and engage your audience, without the steep learning curve of other screen recording software.
Steps On How to Record a Video with Filmora Recorder
To use Filmora as the best alternative to OBS Studio, follow the steps below to begin recording and saving your screen with the Filmora solution.
For Win 7 or later (64-bit)
For macOS 10.12 or later
Step 1: Install and Launch the Software
To start, visit the official website and download the Filmora installer for your desired system. Afterwards, install the software inside your system to get started. For that, you can use this OBS Studio alternative on the go. Just visit the Wondershare official platform on the web and from there, you can find both versions of Filmora software, i-e., Windows and Mac versions with the latest version.
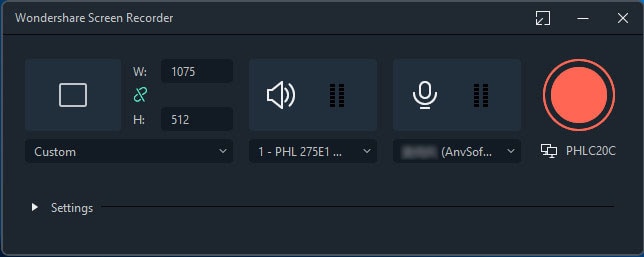
Step 2: Setup Recording UI
To customize your screen, firstly, you need to proceed with the New Project and then open the Screen recorder. For that, go to the File > Record Media and then select your desired format of screen recording from the list as shown here. It’ll take you to the user-friendly UI of Filmora where you can pick up the recording feature on-spot as shown in the figure below:
Step 3: Start Recording
To initiate, simply hit the Record button and it shall start recording your customized screen right away. And same is the process when you’re done with the recording, hit the Stop button that’ll take you inside the video editor to polish your recorded content.
Step 4: Save or Share your Recordings
In the end, when you’re done with various editing and customizations of the editing and recording, Filmora also allows you to upload your masterpiece directly to YouTube or some other renowned platform, you can without much of a stretch select your desired platform to share from there. Just hit the Export button as shown here and it can reveal various choices for you on the go.
Conclusion
OBS is a splendid application to make web-based recordings happen and stream catch on-screen exercises. In any case, it does not have the absolute most significant highlights of common screen recorders. The highlights could be comment devices, editors, document sharing, and so forth Administered of these referenced elements, clients’ involvement with recording could be impacted. Also, to patch up this lack of OBS, clients host to go to third-gathering software like video editors for help. OBS is qualified as the most impressive freeware in the screen recorder industry, when clients retained in its activities lastly become acclimated to it, OBS will turn into their most expert right-hand associate of all time. It will draw in a lot of amateurs who don’t care for ordinary video altering virtual products with muddled apparatuses plan, as recommended above, to the Filmora recorder solution.
Part 2. Best Settings for OBS Recorder
Part 3. How to Record Screen with OBS
Part 4. Alternative Tool to Record Computer Screen
Part 1. How to Download and Install OBS Studio
OBS Studio is an incredible program that doesn’t make a big deal about an effect on your PC’s exhibition. It’s anything but an instrument that simply fires up and works, nonetheless. It expects time to see how it functions and how to benefit from it, and the persistence to figure out how to investigate when things don’t fill in true to form. There are a few circumstances where OBS is ideal over different arrangements. Assuming you will likely record your ongoing interaction and afterwards make a YouTube playthrough instructional exercise, for instance, then, at that point, OBS Studio is an incredible choice.
Step 1: Visit the Website
To begin with OBS Screen Recorder, you want to download and introduce it on your PC. OBS is accessible for all well-known working frameworks, including Windows, Mac, and Linux. You can free download OBS from its authority site
Step 2: Download the Desired Version
OBS is without a doubt one of the most incredible web-based software for Twitch, YouTube, Facebook Live, and so on Video bitrate, encoder and sound bitrate is accessible to design. If you intend to stream ongoing interaction just, select Game Capture.
Step 3: Install the OBS Studio
As we know that, OBS Studio permits you to change the volume from various sources on the double, during recording or gushing also.
Part 2. Best Settings for OBS Recorder
OBS works best assuming you have a multiscreen arrangement where you can notice OBS on one showcase and play your game on the other, however that is not a necessity. OBS Studio packs a ton of elements and settings, and in case you’re willing to invest the energy to learn it, this program offers astonishing adaptability for power clients. To facilitate the expectation to absorb information, OBS Studio incorporates a wizard to assist you with improving your arrangement for web-based or recording video when you first fire up the program. Not at all like the other applications, OBS doesn’t hurl an in-game overlay. All things being equal, it simply takes care of its responsibilities behind the scenes. You’ll likewise need to advise OBS to begin recording or streaming once your game is running or not long before you fire it up.
Video: Another admirable component of OBS Studio is its top-notch video catch. The product kills any worry with the number of edges each second (fps) caught and the video quality. It allows you to alter the catch quality, you effortlessly set your goal or pass by that of your screen. Likewise, it’s not difficult to set your fps and apply a goal downscale of your decision.
Sound: It likewise empowers you to record the sound card of your PC and in-assembled amplifier. There are additional elements to utilize push-to-talk, quiet/unmute MIC, work area support, MIC/AUX lift, and MIC sync offset. You can generally add remarks or your voice as wanted.
Output: OBS Studio makes it simple to dabble with the diverse recording and live streaming settings to track down the most ideal choice. The application likewise permits you to add text and logo to the live recordings effortlessly.
Hotkeys: Set up the hotkeys for getting down on highlights immediately. This part is exceptionally degree modified, so there will be no further guidelines on the most proficient method to set up hotkeys.
Stream: It empowers you to live web-based to Twitch, YouTube, Facebook, and some other RTMP server. You can likewise add different components to your stream or recording, remembering an image for picture webcam shot, customized watermarks, and that’s only the tip of the iceberg. In addition, you can likewise set up the Zoom show, or stream Microsoft Team.
Part 3. How to Record Screen with OBS
In the wake of surveying and testing, all OBS highlights most would agree that it is probably the best program for catching video and real-time. A great scene manager permits you to control activities during streams as definitively as could be expected. The way that OBS is free makes it available to anybody, and it doesn’t devour a lot of memory and assets, settling on it the ideal decision for some clients. Here are its use steps:
Step 1: Launch the Application
To get everything rolling with OBS Studio you initially make what is known as a “Scene” that houses generally your recording sources. Then, at that point, you add the sources like a game, your webcam, amplifier, and watermark. OBS Studio’s Settings offer a flat-out ton of designs, yet the key ones you’ll need to focus on are under Settings > Output > Recording. Here you can indicate the video encoder to utilize, the recording organization, and recording quality.
Step 2: Start Recording
Whenever you’ve determined everything for recording, you click the Start Recording button, fire up your game, and afterwards when you’re done snap Stop Recording. Before running your first authority recording, you’ll need to affirm that OBS is arranged appropriately and working before depending on it for a full gaming meeting.
Step 3: Stop and Save Recording
Finally, when you’ve done the recording, hit the Stop Recording button and the file will automatically be saved to your PC, to the desired location that you’ve inserted in the saving slot.
Part 4. Alternative Tool to Record Computer Screen
Are you looking for a reliable and user-friendly screen recording software that can help you create high-quality videos for your projects? While OBS (Open Broadcasting Software) is a popular choice among many content creators, it may not be the best fit for everyone. Fortunately, there is an alternative that offers similar features and more: Filmora.
Filmora is a powerful and versatile screen recording software that is designed for both beginners and professionals. With its intuitive interface and easy-to-use tools, you can create impressive videos in no time. Whether you want to record your gameplay, tutorials, webinars, or presentations, Filmora has everything you need to capture, edit, and share your content. Plus, it offers a wide range of customization options, including audio and video effects, transitions, text overlays, and more. With Filmora, you can create videos that stand out and engage your audience, without the steep learning curve of other screen recording software.
Steps On How to Record a Video with Filmora Recorder
To use Filmora as the best alternative to OBS Studio, follow the steps below to begin recording and saving your screen with the Filmora solution.
For Win 7 or later (64-bit)
For macOS 10.12 or later
Step 1: Install and Launch the Software
To start, visit the official website and download the Filmora installer for your desired system. Afterwards, install the software inside your system to get started. For that, you can use this OBS Studio alternative on the go. Just visit the Wondershare official platform on the web and from there, you can find both versions of Filmora software, i-e., Windows and Mac versions with the latest version.
Step 2: Setup Recording UI
To customize your screen, firstly, you need to proceed with the New Project and then open the Screen recorder. For that, go to the File > Record Media and then select your desired format of screen recording from the list as shown here. It’ll take you to the user-friendly UI of Filmora where you can pick up the recording feature on-spot as shown in the figure below:
Step 3: Start Recording
To initiate, simply hit the Record button and it shall start recording your customized screen right away. And same is the process when you’re done with the recording, hit the Stop button that’ll take you inside the video editor to polish your recorded content.
Step 4: Save or Share your Recordings
In the end, when you’re done with various editing and customizations of the editing and recording, Filmora also allows you to upload your masterpiece directly to YouTube or some other renowned platform, you can without much of a stretch select your desired platform to share from there. Just hit the Export button as shown here and it can reveal various choices for you on the go.
Conclusion
OBS is a splendid application to make web-based recordings happen and stream catch on-screen exercises. In any case, it does not have the absolute most significant highlights of common screen recorders. The highlights could be comment devices, editors, document sharing, and so forth Administered of these referenced elements, clients’ involvement with recording could be impacted. Also, to patch up this lack of OBS, clients host to go to third-gathering software like video editors for help. OBS is qualified as the most impressive freeware in the screen recorder industry, when clients retained in its activities lastly become acclimated to it, OBS will turn into their most expert right-hand associate of all time. It will draw in a lot of amateurs who don’t care for ordinary video altering virtual products with muddled apparatuses plan, as recommended above, to the Filmora recorder solution.
- Title: [Updated] Decoding the Full Scope of OBS Screen Recorder for 2024
- Author: Adele
- Created at : 2024-07-16 22:04:17
- Updated at : 2024-07-17 22:04:17
- Link: https://screen-recording.techidaily.com/updated-decoding-the-full-scope-of-obs-screen-recorder-for-2024/
- License: This work is licensed under CC BY-NC-SA 4.0.