![[Updated] 2024 Approved Uncharted Territories in Video Streamer Realm](https://thmb.techidaily.com/84ba87eddab3e368851899b58852311f605514d50db5d45ec6de18d3ab0b6cd6.jpg)
"[Updated] 2024 Approved Uncharted Territories in Video Streamer Realm"
Uncharted Territories in Video Streamer Realm
ManyCam is extremely popular for live streaming and video calling. It is equally popular as a screen recorder as users want to record live streams and video conferences. ManyCam lets you use a virtual background or green screen effect to enhance the video quality. You can also use a whiteboard for explaining anything. You can stream video from different sources, add overlays as well as go for Picture-in-Picture mode.
Along with these features, ManyCam allows you to record your screen as well as your webcam video and live streams. Therefore, you can create training videos, capture web conferences, and 4K videos. But it is a premium software and you have to pay to avail all its features without any limitation. Now the question arises if ManyCam is worth your money or there is a better alternative available. Check out our ManyCam review and find out the answer you are looking for.
1. How To Download and Use ManyCam
ManyCam is a premium software and hence, you have to purchase its plan to unlock all its features. However, you can download its free trial version beforehand and try it out before purchasing any plan. Here are the steps to download and start using the software for live streaming and screen recording.
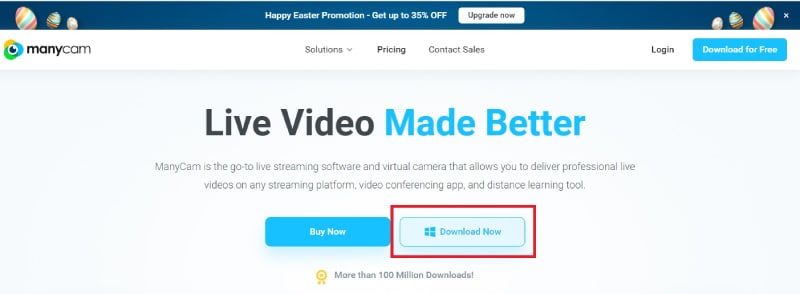
Step 1: From your web browser, visit “manycam.com”. Click on ManyCam Download Now button. The install will get downloaded.
Step 2: Install ManyCam on your computer from the downloaded file. After proper installation, launch ManyCam.
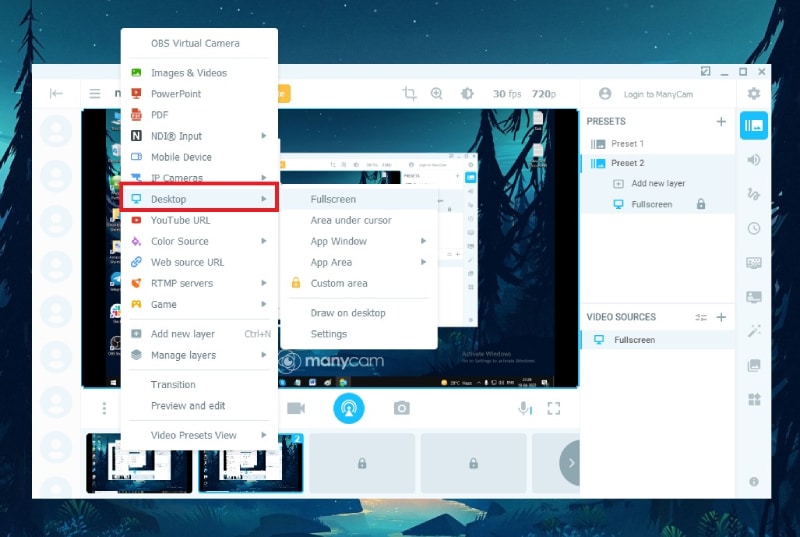
Step 3: In order to record the screen, right-click on the first screen. Select Desktop option and choose the recording area.

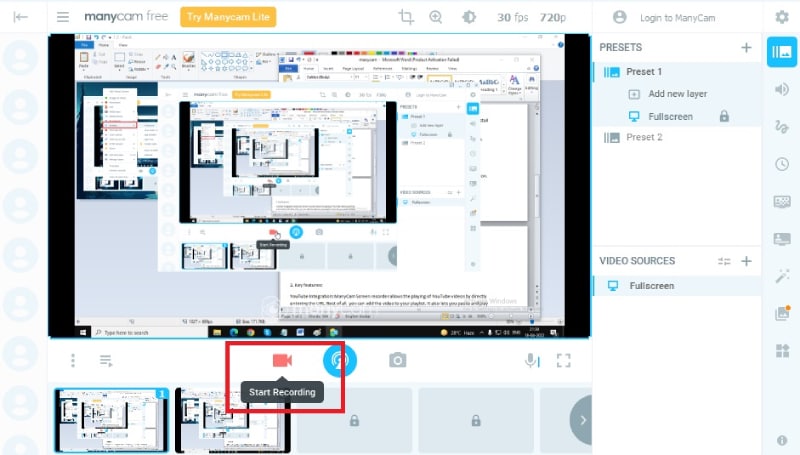
Step 4: Once you are ready with the screen that you want to record, click on Start Recording icon.
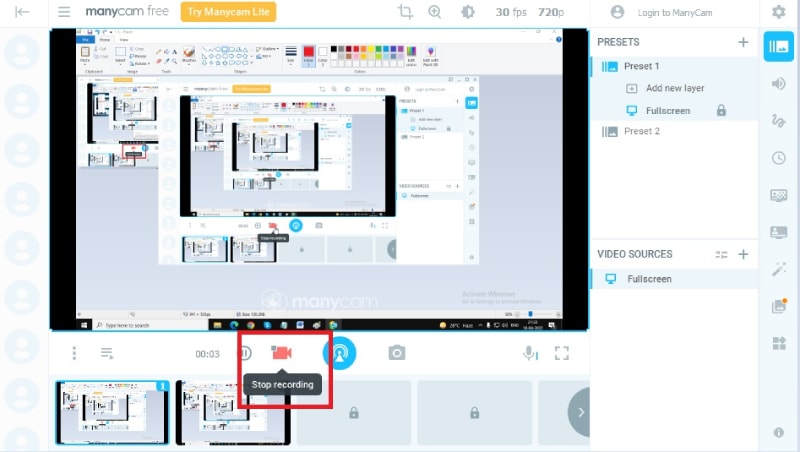
Step 5: When you want to stop recording, click on Stop Recording icon.

2. Key Features of ManyCam
ManyCam is an extremely feature-rich software, and you should know the main features of the software before you install and use it. Starting from live streaming to screen recording, here are the key features of ManyCam you should be aware of.
Video Recording – You can record your screen, your webcam video, video calls, web conferences and live streams with ManyCam. You can also record in Picture-in-Picture mode with screen and webcam video as well as use Whiteboard in your video while recoding.
Virtual Background: Virtual backgrounds let you create professional-quality live videos with any background of your choice. It lets you replace the screen background without any green screen. You can blur or remove your background with images and videos.
Green Screen: By activating the green screen option, users can change the background more accurately than the virtual background option. It enables replacing the color of the background screen with videos or images in video calls and live streams. Most professionals use green screens to change their backgrounds.
Multiple Video Sources: ManyCam lets you add pre-recorded videos and multiple webcams for professional-quality live videos. It lets you utilize all the available resources so that your video can stand out easily. You can add images, app screen, computer screen, and even web sources on your video for better illustrations as per requirements.
3D Effects and Masks: With thousands of effects, masks, and objects, ManyCam is perfect for making engaging live streams. With the drag and drop feature, you can add images and GIFs on the go. Besides, there are draw and text tools also available to draw and write anything as required.
YouTube Integration: ManyCam allows the playing of YouTube videos and you can use YouTube as the main video source in your live stream. You can add the videos to your playlist so that you can play them while live streaming. Besides, you can add web pages as video sources if required.
Besides, you can import presets to improve your video quality. There is also an option to add other ManyCam users directly in your video. You can also stream your video live on Facebook and YouTube through ManyCam.
3. Pros and Cons
Let us come to ManyCam review where we are going to state the pros and cons of ManyCam. Once you know the strengths and weaknesses of any software, you can conclude if the software is tailor-made to satisfy your requirements or if there is a better alternative available. Here are the pros and cons of ManyCam that you should be aware of.
**Pros –
- Allows streaming and recording from different video sources.
- Use virtual backgrounds, green screen background, and even whiteboard.
- Live stream directly to Facebook and YouTube. Invite other ManyCam users to join.
- Supports desktop screencasting, picture-in-picture mode, as well as adding overlays.
- Strong motion detection, automated bitrate adjustment, and adding different parameters.
- Hundreds of effects and 3D masks, options to draw and add texts, and add different layers.
**Cons –
- The settings for recording video are limited and complicated.
- Too many features and functionalities make the user interface messy.
- Some glitches are reported while live streaming and recording at high resolution.
- The editing option post recording is very limited.
Therefore, it is safe to say that ManyCam as a live streaming platform is good enough but there are many limitations and dissatisfaction as far as ManyCam screen recorder is concerned. If your main objective to record professional-quality videos, ManyCam may not be suitable as there are better alternatives available.
4. Best alternative
We recommend Filmora as the Best ManyCam alternative when it comes to recording your screen and webcam together. Filmora is also a far better editor than ManyCam and professionals use Filmora for video recording and video editing. You can capture 4K videos without any glitch or performance lag. Besides, you can save the recorded video in different file formats as per your requirements. Here are the steps to record screen and webcam with Filmora.
For Win 7 or later (64-bit)
For macOS 10.12 or later
Step 1: Download and install Wondershare Filmora on your computer. Launch Filmora and opt for PC Screen option.

Step 2: Select the recording screen area and audio sources as per your requirements. Enable Record the Camera Stream option to record webcam as well as screen video.

Step 3: When you are ready, click on Record button. You will get a few buffer seconds to switch to your screen. You can press F9 key to stop recording. Thereafter, edit the recording and export in the desired file format.

Conclusion
ManyCam screen recorder is great as a live streaming platform but it does not live up to the expectations as a screen recorder. That is why if you are going to purchase a software for professional-quality screen and webcam video recording with a high-quality editor for post-production works, we recommend Wondershare Filmora.
**Cons –
- The settings for recording video are limited and complicated.
- Too many features and functionalities make the user interface messy.
- Some glitches are reported while live streaming and recording at high resolution.
- The editing option post recording is very limited.
Therefore, it is safe to say that ManyCam as a live streaming platform is good enough but there are many limitations and dissatisfaction as far as ManyCam screen recorder is concerned. If your main objective to record professional-quality videos, ManyCam may not be suitable as there are better alternatives available.
4. Best alternative
We recommend Filmora as the Best ManyCam alternative when it comes to recording your screen and webcam together. Filmora is also a far better editor than ManyCam and professionals use Filmora for video recording and video editing. You can capture 4K videos without any glitch or performance lag. Besides, you can save the recorded video in different file formats as per your requirements. Here are the steps to record screen and webcam with Filmora.
For Win 7 or later (64-bit)
For macOS 10.12 or later
Step 1: Download and install Wondershare Filmora on your computer. Launch Filmora and opt for PC Screen option.
Step 2: Select the recording screen area and audio sources as per your requirements. Enable Record the Camera Stream option to record webcam as well as screen video.
Step 3: When you are ready, click on Record button. You will get a few buffer seconds to switch to your screen. You can press F9 key to stop recording. Thereafter, edit the recording and export in the desired file format.
Conclusion
ManyCam screen recorder is great as a live streaming platform but it does not live up to the expectations as a screen recorder. That is why if you are going to purchase a software for professional-quality screen and webcam video recording with a high-quality editor for post-production works, we recommend Wondershare Filmora.
- Title: [Updated] 2024 Approved Uncharted Territories in Video Streamer Realm
- Author: Adele
- Created at : 2024-07-16 21:45:38
- Updated at : 2024-07-17 21:45:38
- Link: https://screen-recording.techidaily.com/updated-2024-approved-uncharted-territories-in-video-streamer-realm/
- License: This work is licensed under CC BY-NC-SA 4.0.