![[New] Integrating OBS in Daily Skype Monitoring for 2024](https://thmb.techidaily.com/cb2689090616a1ba21a99aa6be50929e603a0dc8061abd47262715b07e4d29cd.jpg)
[New] Integrating OBS in Daily Skype Monitoring for 2024
Integrating OBS in Daily Skype Monitoring
Video interviews for remote jobs are quite common these days because of this quickening pace of the world around us. And these interviews are recorded to further evaluate the information exchanged, so for the recording of these videos certain tools have also been introduced in the market. I myself have used a few of them; and the most popular these days are easily zoom and skype. Both these programs offer clear communication among all concerned parties. The reason why I want to discuss skype here is that zoom’s video quality is an issue, it has got very low video quality and the audio, it records in one track so if you have made a mistake in the speaking or something audible, it will remain there.
So in this article I will discuss that how can you record your skype videos using OBS. Skype has been extensively used for quite a long time now and it hasn’t lost its edge over the years but has actually upgraded and improved its services with time. Coming to OBS which is an open-source software used widely for streaming purposes. It provides an incredible experience courtesy of its variety of editing and recording options. The audio can be recorded from the system and the microphone. And video can be fetched from the webcam. Along with the recording of specific section of the screen.

Part 1: Recording Skype Calls with OBS
To begin with shedding some light on the OBS program:
A little piece of software that can be used for both business and non-commercial purposes. Streaming on YouTube, Twitter, and Facebook is supported. It has the ability to record the screen with cursor effects. It allows you to record your screen indefinitely. Watermarks aren’t added: the video doesn’t have any watermarks. There are options for multichannel, Multilanguage, and single channel.
Now to setup the environment for screen recording we have to follow the following steps.
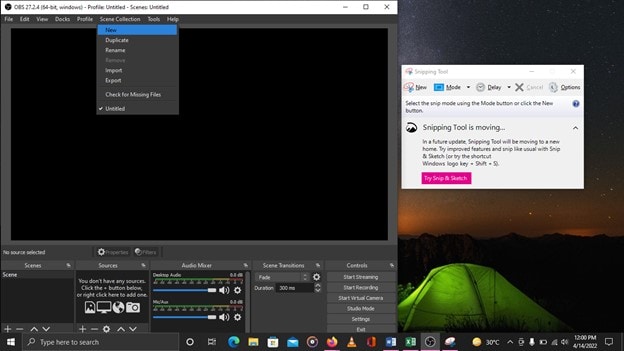
Initially, you’ll be required to have skype installed on your desktop along with the up-to-date version of OBS software. After installing skype you first have to make a secondary/backup account on skype. After that you require a secondary camera as well to record yourself because your webcam can be in demand elsewhere, so you would not be able to record yourself or even the guests wouldn’t be able to see you. And then turn on the given command in skype i-e: skype>settings>calling>advanced>’allow NDI usage’ as shown in the picture. This command allows OBS to access skype videos.

After this you have to open the OBS program and set it up for skype calls, firs thing is to create a new scene, then you’re going to hit the plus button and select the capture device. Now you can see yourself on camera and screen can easily be cropped, while holding ‘Alt’, on OBS so fix it according to your liking. Then press ‘lock’ using the NDI plug-in.

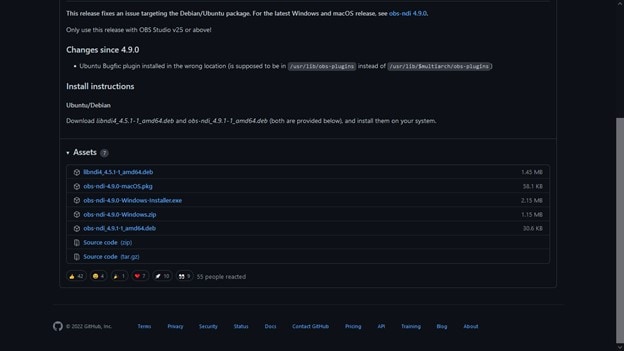
To setup NDI plugin you have to visit https://github.com/Palakis/obs-ndi/releases/tag/4.9.1 and check for the compatible version with your operating system. On this website the plugin is available for windows, mac and Linux.

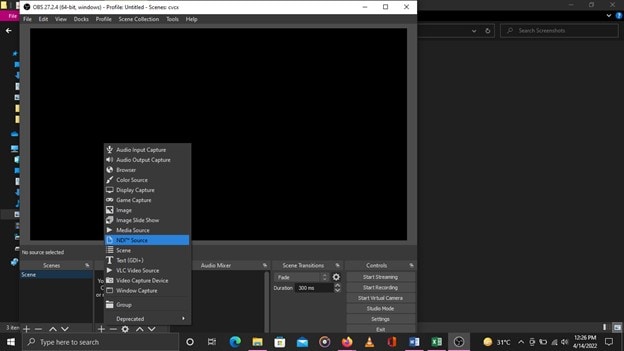
And after addition of plug in you would want to click on ‘+’ again and select NDI plugin and you can select the source video which is going to be the received video.
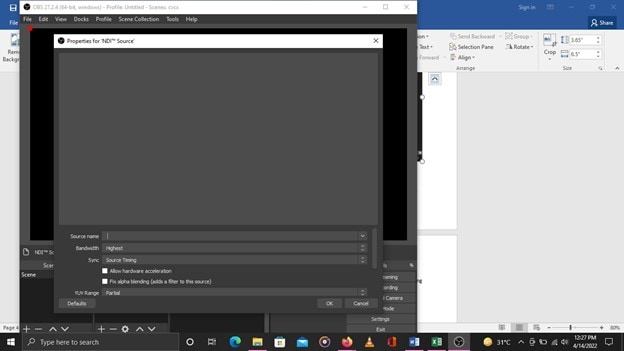
And clicking on it will open a new window where you have to select the guest feed, which will be possible once the call has begun. The call connected will appear on the NDI plugin window.
As you receive the call from the reciever you will see the incoming feed of him as shown in the figure.
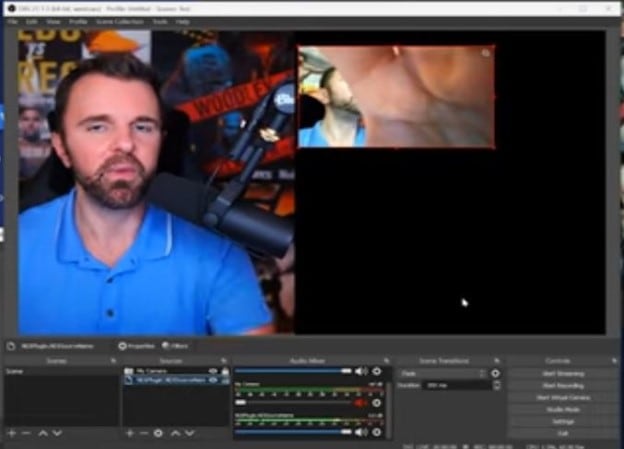
So you can just resize it similarly as you did yours earlier and pressing the lock icon will stop you from mistakenly modify or change the video screen settings. Now to record the video you have to click on record button and your desktop starts recording.
Part 2: OBS Alternative to Record Skype
Filmora
Filmora is a very popular and perfect video recorder and editor designed by Wondershare. Wondershare is software house created in 2003. This software was designed by professional video makers. It has an easy to use and a friendly environment, and easy to understand commands. This software is available for free and compatible with windows and MAC both. This tool can help you connect in a better way with your audience since it allows a wide range of functions, varying from editing and cutting to screen detection, auto-crop and fisheye correction.
You can receive various functions on a single platform if you download this tool to your PC. You do not have to pay anything for this program. It will assist you in creating webinars, online studies, presentations, and YouTube videos. To engage an audience, simply shooting or recording a video is insufficient. You’ll need a tool with a variety of capabilities for this. You can use this tool to cut the duration of the movie and apply some extra effects to make it more appealing. It contains the best video editing features, including fully functional tools for improving the quality of your content.
- Install Filmora.
- After setting up the program. You have to click new recording.
For Win 7 or later (64-bit)
For macOS 10.12 or later

- This window gives you options regarding screen size, resolution and devices which will record your audio and videos.

- This window is to configure all the audio and video devices. So you can get audio from any device and similarly video devices can also be configured.

- After the configuration, you can click on the big red button to start the recording.

FAQs Regarding Skype Recording
How do I add Skype video on OBS?
Now we must set up the setting for screen recording by following the instructions below.
- To begin, you’ll need to have Skype installed on your computer, as well as the most recent version of OBS software.
- You must first create a secondary/backup account on Skype after installing it.
- After that, you’ll need a secondary camera to record yourself because your webcam may be in use elsewhere, preventing you from recording yourself or allowing your guests to view you.
- Then, as explained earlier in the image, enable the following command in Skype: skype>settings>calling>advanced>’allow NDI usage’.
OBS can now access Skype videos with this command.
Can you screen record Skype with audio?
Yes, OBS can record audio of skype separately as well as mixed up, you can separately record the tracks from the caller and the receiver and later manipulate them as well. There are options for changing the audio devices for your own computer. And I recommend that you separate your audio right now. Everything is set up in a way that everything’s going to come through one audio feed. I don’t like that. I think it’s better if you separate your audio that. Let’s say you cough during an interview or something. You’re actually able to cut that out and you can actually record a separate feed itself.
Capturing Audio in OBS Studio on a Mac
On a Mac, you’ll need to install an additional OBS plugin to capture audio.
- Install iShowU Audio Capture on your computer.
- Make sure you navigate to Security & Privacy in your System Preferences.
- To proceed, you may need to grant permission to “Shiny White Box.”
- Restart your Mac after the installation is complete.
- Open Audio MIDI Setup after rebooting.
- At the bottom left of the window, click the Plus button.
- Select Create Multi-Output Device from the drop-down menu.
So form the above discussion it can be concluded that OBS for screen recording can be a very handy tool because it has the ability to easily record skype videos along with separate audio recording to avoid interference of sounds and mix ups. The separate audio recording system allows us to manipulate and modify the sounds along with the video quality. Skype is a tool much used by the world for quite some time and it still continues to serve us with numerous improvements and updates to simplify the complex world of networking today and the tools to use it properly help us communicate better with others. Also you can add cool graphics with your video to ornate your work. So If you want to buy graphics, templates, and other similar items, even if you only have rudimentary Photoshop skills, there are a lot of really skilled designers on here with pretty affordable costs if you want to buy graphics and other similar items.
For Win 7 or later (64-bit)
For macOS 10.12 or later
- This window gives you options regarding screen size, resolution and devices which will record your audio and videos.
- This window is to configure all the audio and video devices. So you can get audio from any device and similarly video devices can also be configured.
- After the configuration, you can click on the big red button to start the recording.
FAQs Regarding Skype Recording
How do I add Skype video on OBS?
Now we must set up the setting for screen recording by following the instructions below.
- To begin, you’ll need to have Skype installed on your computer, as well as the most recent version of OBS software.
- You must first create a secondary/backup account on Skype after installing it.
- After that, you’ll need a secondary camera to record yourself because your webcam may be in use elsewhere, preventing you from recording yourself or allowing your guests to view you.
- Then, as explained earlier in the image, enable the following command in Skype: skype>settings>calling>advanced>’allow NDI usage’.
OBS can now access Skype videos with this command.
Can you screen record Skype with audio?
Yes, OBS can record audio of skype separately as well as mixed up, you can separately record the tracks from the caller and the receiver and later manipulate them as well. There are options for changing the audio devices for your own computer. And I recommend that you separate your audio right now. Everything is set up in a way that everything’s going to come through one audio feed. I don’t like that. I think it’s better if you separate your audio that. Let’s say you cough during an interview or something. You’re actually able to cut that out and you can actually record a separate feed itself.
Capturing Audio in OBS Studio on a Mac
On a Mac, you’ll need to install an additional OBS plugin to capture audio.
- Install iShowU Audio Capture on your computer.
- Make sure you navigate to Security & Privacy in your System Preferences.
- To proceed, you may need to grant permission to “Shiny White Box.”
- Restart your Mac after the installation is complete.
- Open Audio MIDI Setup after rebooting.
- At the bottom left of the window, click the Plus button.
- Select Create Multi-Output Device from the drop-down menu.
So form the above discussion it can be concluded that OBS for screen recording can be a very handy tool because it has the ability to easily record skype videos along with separate audio recording to avoid interference of sounds and mix ups. The separate audio recording system allows us to manipulate and modify the sounds along with the video quality. Skype is a tool much used by the world for quite some time and it still continues to serve us with numerous improvements and updates to simplify the complex world of networking today and the tools to use it properly help us communicate better with others. Also you can add cool graphics with your video to ornate your work. So If you want to buy graphics, templates, and other similar items, even if you only have rudimentary Photoshop skills, there are a lot of really skilled designers on here with pretty affordable costs if you want to buy graphics and other similar items.
- Title: [New] Integrating OBS in Daily Skype Monitoring for 2024
- Author: Adele
- Created at : 2024-08-02 12:06:35
- Updated at : 2024-08-03 12:06:35
- Link: https://screen-recording.techidaily.com/new-integrating-obs-in-daily-skype-monitoring-for-2024/
- License: This work is licensed under CC BY-NC-SA 4.0.